QEMU Virtual Platform
Building SBL
To build SBL for QEMU Intel Q35 virtual platform:
python BuildLoader.py build qemu
The output images are generated under Outputs/qemu/SlimBootloader.bin directory.
Note
QEMU virtual platform does not require stitching the SBL into an IFWI.
Boot to Shell on QEMU Emulator
Now test the newly built SBL image in QEMU emulator from command line:
qemu-system-x86_64 -machine q35 -nographic -serial mon:stdio -pflash Outputs/qemu/SlimBootloader.bin
Console outputs:
============= Intel Slim Bootloader STAGE1A =============
...
============= Intel Slim Bootloader STAGE1B =============
...
============= Intel Slim Bootloader STAGE2 =============
...
==================== OS Loader ====================
Press any key within 1 second(s) to enter the command shell
Shell>
Hint
To exit QEMU in Linux, type ctrl+a, then x. In Windows, type ctrl+c.
Boot to Yocto on QEMU Emulator
Download QEMU Yocto Image to SBL top level source directory
Mount
core-image-minimal-genericx86-64.hddimglocally and renamebzImagetovmlinuz
Linux Users:: Use the commands below
sudo mkdir /mnt/yocto sudo mount -o loop core-image-minimal-genericx86-64.hddimg /mnt/yocto sudo mv /mnt/yocto/bzImage /mnt/yocto/vmlinuz sudo umount /mnt/yocto
Windows Users:: Use the method below
Windows users may need tools that allow mounting the hddimg as a virtual drive in Windows. Once mounted, the bzImage file can be renamed to vmlinuz as required by SBL.
Boot new Yocto image (with graphic console).
Command for booting Yocto using SBL:
qemu-system-x86_64 -machine q35 -m 256 -drive id=mydrive,if=none,file=core-image-minimal-genericx86-64.hddimg,format=raw -device ide-hd,drive=mydrive -serial mon:stdio -boot order=d -pflash Outputs/qemu/SlimBootloader.binSBL should load Yocto and allow you to login from graphics console with username ‘root’.
Boot to a Container Image on QEMU
A container image encapsulates the boot image and a cryptographic signature which is used to verify the integrity of the boot image for secure boot purposes.
Below are the steps to create and boot a container image on QEMU:
Create a container image of your boot image using the following guide: Create Container Boot Image
Note
Make sure you use the correct type of container. For details on which type to use, refer to the Container Tool documentation.
Once you have the container image
container.bincreated, it needs to be copied to the disk image to be used with QEMU. For example, the disk image can be the Yocto disk image as mentioned in the above section.Copy the created
container.binto the mounted disk image.Now, we need to set which boot file to use using the Config Editor tool.
Open the config editor and set your boot options as shown in the image below. Note that the
container.binis the path to the container on the disk. In this example, the file is placed in the root directory of the disk. Refer to the Change Boot Options guide for detailed instructions.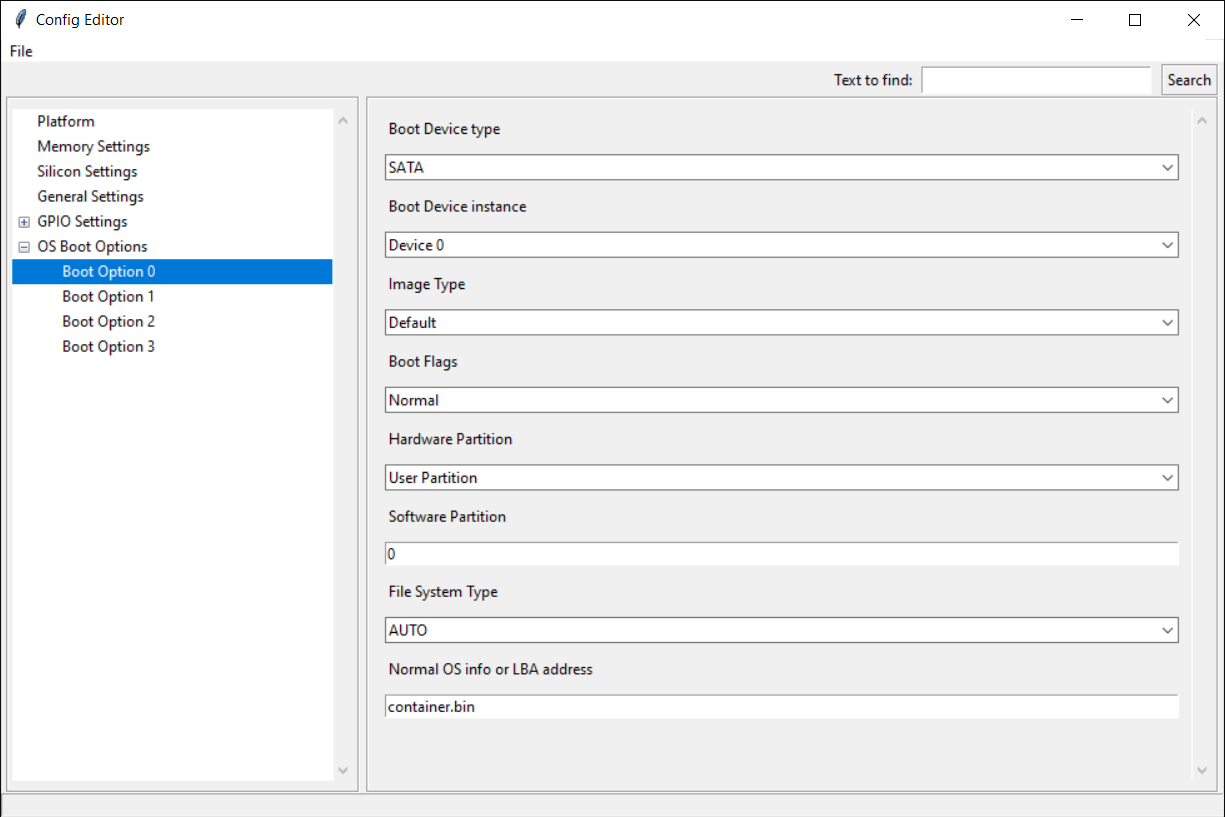
Build SBL for QEMU
Start QEMU. The
-hdaoption will connect the virtual disk image as a SATA drive to QEMU.qemu-system-x86_64 -m 1G -machine q35 -serial mon:stdio -nographic -pflash Outputs/qemu/SlimBootloader.bin -hda <path/to/disk_image>